Applying Plastic Over Windows Project

This page details how to install shrink-to-fit plastic wrap over existing windows. The use of plastic heat-shrink window coverings is an easy, effective, and inexpensive window option.
Use the information below to determine if this project is a good fit for your home, what common problems it can help address, what the potential benefits are, what tools and materials you’ll need to complete the project if you choose to do it yourself, important safety considerations, step-by-step instructions for getting the job done and when to seek professional assistance.
QUESTIONS TO CONSIDER
Common Signs and Symptoms
Some obvious signs and symptoms that your home has air leaks and can benefit from plastic sealing are:
- Rattling windows
- Visible gaps around the window or door trim
- Noticeable pests and dust entering through gaps or holes in or around the window or door
- Odors from the outside entering the home
- Peeling paint around the window or door frame
What to Look For
Locating air leaks can be tricky, as they are often very small and barely noticeable. There are several quick and easy do-it-yourself (DIY) ways to locate leaks.
- Perform a paper test: close the window on a piece of paper. If it easily moves back and forth this means your window could be tighter. This can be accomplished by adding thicker weather stripping.
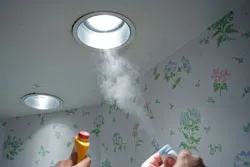
- Light an incense stick and hold it next to the seams or sash of the window. Watch the smoke to see if the smoke is pushed in a particular direction. If you see the smoke pushed one way or another, you most likely have a leak.
Click the picture on the left for step-by-step instructions on performing any one of these tests.
Alternatively, finding a home energy professional to perform this job may be a better solution as they have the tools to easily pinpoint the problems and complete the project for you.
Did You Know?
Your local utility may offer rebates for a professional home energy assessment and certain air sealing and insulation projects.
Be sure to contact your utility company before beginning a project to see what incentives are available in your area. You can also check for incentives using the DSIRE database for state incentives.
Savings in Energy and Money

Leaks around windows can lead to uncomfortable drafts and energy losses. While these projects may have less impact on energy use than those in the attic and basement, they tend to be the more accessible areas and are perfect for a do-it-yourself project. Window film covers are inexpensive, reduce drafts, help the house feel warmer during winter months, and reduce moisture buildup on the window due to condensation. They can also eliminate air leaks around the window if they extend over the woodwork, and this extra layer of plastic adds another layer of insulating air to reduce heat loss through the window.
If you prefer simpler home improvement projects, applying plastic over windows may be a good DIY project for you.
| Doing the Project Yourself | ||
|---|---|---|
| Ease of Project | Time (days) | Costs |
| Easy | 1 | $ |
Key: $ = <$100, $$$$$ = >$2,000
Materials and Equipment
Materials
- Plastic window kit, which includes
- Clear plastic film
- Double-sided tape or magnetic tape
Tools
- Scissors
- Utility knife
- Hair dryer
- Tape measure
- Cotton balls
- Rubbing alcohol
- Ladder
Tips and Safety Considerations
- Kits are available in several sizes at home improvement, hardware, and discount stores.
- The plastic film comes in window-sized pieces in the kits; purchase a kit that fits the width of your window.
- When winter is over, take down the plastic and pull the tape off the trim. The tape removes easily without damaging the finish.
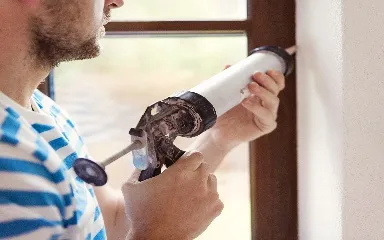
Installing temporary plastic window storms:
- Consult the instructions on the box.
- Properly size the film, leaving a few inches on either side.
- Clean the window frame before applying the film.
- Apply the adhesive and then film, using the hair dryer to tighten the film.

Applying plastic film over mini blinds:
Applying plastic over your window can prevent you from being able to open and close your mini-blinds. Follow the steps below for a neat trick on how to operate your mini-blinds even when they’re covered with window film:
- Remove the rotating wand from the blinds before you apply the shrink film. To unhook the wand, lift the retaining ring (if any) and lift the wand off the hook.
- Apply the window film and shrink it in place, as described in the step-by-step guide above.
- Apply four strips of cellophane tape to the window film surrounding the wand hook.
- Overlap each strip at the corners so they reinforce each other.
- Cut out the center of the square with a new utility blade (a dull blade will rip the film).
- Install the wand and pull out the lift cords.


Looking for your next Wall/Windows/Doors sealing project? Try one of these: